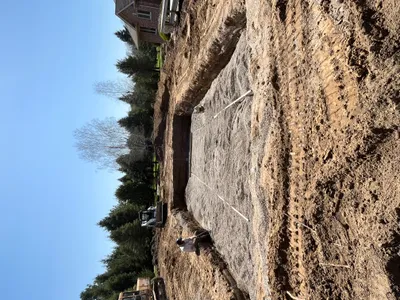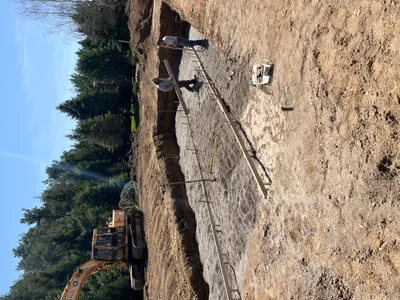
Most homeowners picture pool installation starting with a big excavator digging a hole. That is the exciting part. But there is a fair amount of work that needs to happen before the excavator shows up, and skipping any of it can cause real problems down the road.
Site prep is not complicated, but it does require careful attention. The goal is to make sure the yard is ready for heavy equipment, the pool can be placed exactly where it should go, and nothing underground gets damaged in the process.
This article walks through everything that happens before the dig, so you know what to expect and can plan accordingly.
Why does site prep matter so much?
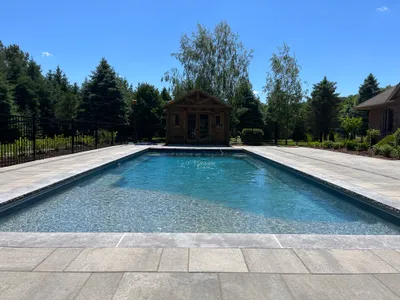
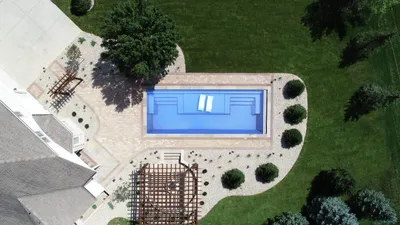
A fiberglass pool shell is a single piece of moulded fibreglass that gets lowered into a hole. Unlike a concrete pool that gets built in place, a fiberglass pool needs the hole to be exactly the right size and shape, the ground to be level, and the drainage to be correct from the start.
If the site is not properly prepared, you can run into problems like:
- Water pooling around the pool because the grading slopes toward the pool instead of away from it
- The pool shifting or settling because the base was not compacted properly or the soil was not suitable
- Damaged utility lines because no one checked where the gas, water, or electrical lines run through the yard
- Equipment getting stuck because the access route was too narrow or the ground was too soft
- Change orders and delays because unexpected conditions were discovered during excavation
Good site prep avoids all of that. It is not the most exciting part of the process, but it is one of the most important.
Can the equipment actually get to your backyard?
This is one of the first things any pool installer checks, and it is the thing that catches homeowners off guard most often.
To install a fiberglass pool, heavy equipment needs to reach your backyard. That typically means a compact excavator (mini excavator), a skid steer, and a truck carrying gravel. The pool shell itself either gets craned over the house or carried through a side access route.
What the excavator needs
A compact excavator is usually about 6 to 8 feet wide. Add some clearance on each side and you need a path that is at least 10 feet wide. The path also needs to be firm enough to support the weight without the machine sinking in.
Common access issues include:
- Narrow side yards. Many homes in London's newer subdivisions have side yards that are only 5 to 8 feet wide. That is not enough for a standard excavator. In some cases, a smaller machine can be used, but it takes longer.
- Gates and fences. A section of fence usually needs to be temporarily removed. This is normal and expected. The fence goes back up after the pool is in.
- Overhead wires. Low-hanging power lines, cable lines, or tree branches over the access route can block equipment. These need to be addressed before work starts.
- Soft ground. If the access route crosses a lawn that has been wet, the equipment can tear up the ground badly. Some installers lay down mats or plywood to protect the lawn.
Getting the pool shell to the backyard
A fiberglass pool shell is a large, rigid structure. A typical 14 x 30 foot pool shell is about 10 feet wide and 32 feet long. It does not bend or fold.
If the access route is wide enough, the shell can be walked through the yard on a wheeled carrier. If there is no suitable ground-level access, the shell gets lifted over the house by crane. Crane placement adds cost, typically $2,000 to $5,000 depending on the lift distance and difficulty.
| Access Method | Requirements | Added Cost |
|---|---|---|
| Ground access (carry-in) | 10–16 ft wide path, firm ground | Usually included in quote |
| Crane over house | Crane access from street, clear overhead | $2,000 – $5,000 |
| Crane from neighbour's yard | Neighbour's permission, crane access | $2,500 – $6,000 |
Your installer will assess access during the site visit and let you know which method makes sense for your property.
What about underground utilities?
Before anyone digs in Ontario, underground utilities must be located. This is not optional. It is a legal requirement.
Ontario One Call (1-800-400-2255) coordinates the process. When contacted, they notify the utility companies that serve your area, and those companies send crews to mark the location of their lines in your yard. This includes:
- Natural gas lines (marked in yellow)
- Electrical/hydro cables (marked in red)
- Water mains (marked in blue)
- Telecom and cable (marked in orange)
- Sewer lines (marked in green)
The locate service is free, but it can take up to 5 business days. Your pool installer should handle this as part of the planning process.
What if utilities run through the pool area?
If a gas line or water main runs directly through the spot where the pool is planned, the pool location may need to shift, or the utility may need to be relocated. Relocating a gas line, for example, can cost $2,000 to $5,000 or more depending on the distance.
This is one reason the site visit matters so much. An experienced installer will look at the likely utility paths before committing to a pool location. Most homes have utilities entering from the street side of the house, so the backyard is usually clear. But not always.
Private utilities, like a line running to a detached garage, a septic system, or an irrigation system, are not covered by Ontario One Call. Your installer should ask about these, and it helps to know what is buried in your yard before the site visit.
How does grading and drainage affect the project?
Grading is the slope of the ground. For a pool installation, two things matter: the grade of the pool area itself, and the grade of the surrounding yard.
The pool area
The bottom of the pool excavation needs to be level. If your yard slopes, one side of the hole will be deeper than the other. This is normal and expected, but a significant slope means more excavation on the high side and potentially a retaining wall on the low side.
A yard with more than 2 to 3 feet of slope across the pool area will require extra grading work. This adds cost, typically $1,500 to $5,000 depending on how much earth needs to be moved.
Drainage away from the pool
Water needs to drain away from the pool, not toward it. If surface water flows into the pool area, it can undermine the backfill, cause the pool to shift, and create a muddy mess around the patio.
Your installer will plan the grading so the finished patio and surrounding ground slope gently away from the pool. In some cases, a French drain or catch basin is needed to redirect water that would otherwise flow toward the pool.
| Grading Scenario | What It Means | Extra Cost |
|---|---|---|
| Flat yard, good drainage | Ideal conditions, minimal grading needed | Included in quote |
| Mild slope (1–2 ft across pool area) | Some extra excavation, minor grading | $1,000 – $2,500 |
| Significant slope (3+ ft) | Major grading, possible retaining wall | $3,000 – $10,000+ |
| Poor drainage / low spot | French drain or catch basin needed | $1,500 – $4,000 |
What obstacles need to be cleared?
Most backyards are not empty lots. There are things in the way, and they need to be dealt with before the excavator arrives.
Trees
Trees near the pool area are one of the most common obstacles. A tree does not have to be exactly where the pool goes to be a problem. Tree roots can extend 20 feet or more from the trunk, and roots near the pool can cause damage over time.
In the City of London, removing a tree over a certain diameter may require a permit. The city has a tree protection bylaw, and your installer should be aware of it. The cost to remove a mature tree ranges from $500 to $3,000 depending on size and location.
Not every tree near the pool needs to be removed. But trees directly in the pool footprint, in the access route, or that overhang the pool significantly will likely need to go. Trees that drop a lot of leaves or needles into the pool area are also worth discussing.
Sheds, decks, and other structures
If a shed, old deck, playhouse, or other structure sits in the pool area or the access route, it needs to be removed. Most homeowners handle smaller items themselves to save on cost. Larger structures like a deck or concrete pad may need to be removed by the installer.
Costs for removing structures vary widely:
- Small shed removal: $300 – $800
- Old deck removal: $1,000 – $3,000
- Concrete pad removal: $500 – $2,000
- Old fence section removal: $200 – $600
Fences
A section of fence almost always needs to be temporarily removed to allow equipment access. If the fence is old and in poor shape, this is a good time to replace it. Your municipality will require a pool fence anyway, and many homeowners replace the entire backyard fence as part of the pool project.
How do soil conditions affect pool installation?
The type of soil in your yard affects how the excavation goes, how the pool is supported, and what kind of drainage is needed. In the London, Ontario area, soil conditions vary quite a bit from one neighbourhood to the next.
Clay soil
Clay is very common in Southwestern Ontario. It is heavy, dense, and holds water. When clay gets wet, it expands. When it dries, it contracts. This movement can put pressure on a pool shell if the drainage is not right.
With clay soil, extra attention goes to the gravel backfill around the pool. The gravel acts as a drainage layer, allowing water to move down and away from the pool shell rather than pressing against it. A properly installed fiberglass pool in clay soil performs just fine, but the installer needs to account for it.
Sandy soil
Sandy soil is easier to excavate and drains well. It is less common in the London area but does exist in pockets. The main consideration with sandy soil is that it does not compact as firmly as clay, so the gravel base under the pool needs to be well-compacted.
Rocky soil or bedrock
Hitting rock during excavation is unusual in London proper, but it happens in some rural areas around the region. If the excavator hits rock, it slows the job down significantly. Rock may need to be broken with a hydraulic hammer, which adds time and cost.
Rock excavation can add $2,000 to $8,000 or more depending on how much rock needs to be removed. This is one of those things that is hard to know for certain until the digging starts, which is why experienced installers include contingency language in their contracts.
High water table
In some areas, the water table is high enough that the excavation fills with groundwater as it is being dug. This is manageable but requires dewatering, which means pumps running continuously during installation to keep the hole dry enough to work in.
Your installer may be able to predict this based on the area and soil type, but in some cases it is only discovered during excavation.
| Soil Type | Common In | Key Consideration |
|---|---|---|
| Clay | Most of London, Dorchester | Extra drainage, gravel backfill critical |
| Sandy | Parts of Komoka, Grand Bend area | Good drainage, needs firm compaction |
| Rocky / bedrock | Rural areas north of London | Slower excavation, higher cost |
| High water table | Low-lying areas, near creeks | Dewatering pumps needed during install |
What does a site visit actually look like?
A site visit is when your pool installer comes to your property, walks the yard, takes measurements, and assesses all the factors discussed in this article. It usually takes 30 minutes to an hour.
During a site visit, the installer will typically:
- Walk the access route from the street to the backyard, noting any restrictions
- Measure the yard to determine where the pool can go, considering setback requirements from property lines, the house, and any easements
- Assess the grade to understand how much grading work is needed
- Note obstacles like trees, sheds, fences, decks, or anything else that needs to move
- Look for utility indicators like gas metres, hydro transformers, or manhole covers that hint at where underground lines might run
- Discuss the soil based on what they can see and what they know about the neighbourhood
- Talk through your vision for pool placement, patio, and any features you are thinking about
A good site visit is not a sales pitch. It is a technical assessment. The installer should be asking you questions, not just showing you brochures. They should be honest about any challenges they see with your yard.
Some installers charge for a site visit. Others include it as part of the quoting process. Either way, never sign a contract with a pool company that has not visited your property. A pool quote based on photos alone is a quote full of assumptions.
How much does site prep cost?
Site prep costs are typically included in the overall pool project quote, but it helps to understand where the money goes.
For a straightforward installation with good access, flat ground, and no major obstacles, site prep costs are minimal and built into the standard excavation and grading line items.
For more complicated sites, additional costs can add up:
| Site Prep Item | Typical Cost (CAD) |
|---|---|
| Tree removal (per tree) | $500 – $3,000 |
| Shed or structure removal | $300 – $3,000 |
| Fence section removal and reinstall | $200 – $1,000 |
| Extra grading for sloped yards | $1,000 – $5,000 |
| French drain or catch basin | $1,500 – $4,000 |
| Utility relocation | $2,000 – $5,000+ |
| Rock excavation | $2,000 – $8,000+ |
| Crane for pool shell | $2,000 – $6,000 |
A yard with none of these issues might add $0 in extra site prep costs. A yard with several of them could add $5,000 to $15,000 to the project. This is exactly why the site visit matters.
How long does site prep take?
The physical work of clearing obstacles, grading, and preparing the access route typically takes 1 to 3 days. Simple sites might need just a few hours of clearing before the excavator starts.
The part that takes longer is the planning side. Ontario One Call utility locates can take up to 5 business days. If trees need to be removed and a municipal permit is required, that can add a week or two. If a utility needs to be relocated, that is handled by the utility company on their schedule, which can take several weeks.
Your installer should coordinate all of this so that the site is ready when the excavation crew arrives. Delays in site prep are one of the more common reasons pool installations fall behind schedule, which is why it pays to start the planning process early.
What are the most common site prep surprises?
Even with a thorough site visit, surprises happen. Here are the ones we see most often:
- Buried concrete or debris. Old patios, walkways, or construction debris buried under the lawn. This is common in older neighbourhoods where previous owners poured concrete and later covered it with sod.
- Unmarked utilities. Private lines that were not installed by a utility company and do not show up on Ontario One Call locates. Irrigation systems, low-voltage lighting wire, and lines to outbuildings are common culprits.
- Unexpected soil conditions. The soil at the surface does not always match what is 5 or 6 feet down. An area that looks like firm clay on top might have a layer of soft fill material underneath from previous construction.
- Drainage issues that were not visible. Some yards have hidden drainage problems that only become apparent when the ground is disturbed. Water that was being absorbed by tree roots, for example, may need a new path once the tree is removed.
- Easements and setbacks. Some properties have easements (areas where the utility company has the right to access) that restrict where a pool can go. These are on the property survey but not always obvious from looking at the yard.
A reputable installer will have language in their contract that addresses unexpected conditions. Ask how change orders are handled before you sign. It is better to have that conversation upfront than during excavation.
Frequently Asked Questions
What does site prep for a fiberglass pool involve?
Site prep includes checking equipment access to your backyard, locating underground utilities, evaluating soil conditions, removing obstacles like trees or sheds, grading the yard for proper drainage, and marking out the pool location. Most of this is assessed during the initial site visit.
How wide does the access route need to be for pool installation?
The access route to your backyard typically needs to be at least 10 to 12 feet wide for the excavator. If the pool shell is being carried through the yard rather than craned over the house, you may need 10 to 16 feet of clearance depending on the shell width. Fences, gates, and narrow side yards are the most common access issues.
Do I need to call before digging for a pool in Ontario?
Yes. Ontario One Call (1-800-400-2255) must be contacted before any excavation. They will send locate crews to mark underground gas, hydro, water, and telecom lines in your yard. This is a legal requirement and is free of charge. Your pool installer should handle this, but it is worth confirming.
Can you install a fiberglass pool in clay soil?
Yes, fiberglass pools can be installed in clay soil. Clay holds water, so proper drainage around the pool is critical. This usually means extra gravel backfill and sometimes a dewatering plan during installation. Clay is common in the London, Ontario area and experienced installers work with it regularly.
How long does site prep take before pool installation?
The physical site prep work typically takes 1 to 3 days, depending on how much clearing is needed. This includes removing obstacles, rough grading, and preparing the access route. The utility locates through Ontario One Call can take up to 5 business days to schedule.